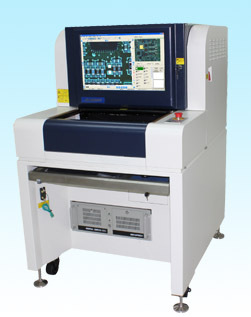
ALD625 AOI
ALD625 AOI
- 产品详情
- 产品参数
ALD625 Divine Vision introduced a new multi-purpose guide to detect new innovative products in the field, it is equipped with the latest technology and the light source image acquisition systems, high component detectable element surface can be detected in post-reflow SMD components, and can be effective solve inspection requirements tinplate process, it is a color ring resistance, after wave, after SMT reflow, the best choice element surface and other technology needs.

ALD625 while continuing to maintain a 430 * 330mm large detection range, the PCB Top side clear height up to 50mm, Bottom side is increased to 110mm, to achieve a high component containing PCB inspection. The operator simply by bad keyboard confirmed and mark, detected by drill bad image enlarged mode is now on the widescreen display, multi-feature comparison of standard image and NG image, make NG Check and confirm sweeping

ALD625 Equipment Specifications
| Function parameters Functional Specifications | |
| Detecting circuit boards | SMT reflow oven after wave after DIP, color ring resistors, after dispensing, component surface inspection |
| Detection | Statistical modeling, full-color image than the right, depending on the detection point is automatically set its parameters (such as offset, polarity, short circuit, etc.) |
| Camera | Full-color high-speed intelligent digital camera |
| Resolution/visual range/speed | Standard: 25 µ m/Pixel FOV: 51.2 mm × 51.2mm detection speed <200ms/FOV Optional: 20 µ m/Pixel FOV: 40.96 mm X40.96mm detection speed <180ms/FOV |
| Source | Highlight RRWB coaxial annular tower LED light source (colored light) |
| Programming Mode | Manually write, automatic frame, CAD data import automatic mapping component libraries |
| Remote control | Remote operation via TCP/IP network, anywhere to view, start or stop the machine running, modify the program and other operations |
| Detection coverage type | Offset, less tin, short circuit, pollution, lack of parts, skew, tombstone, Celi, turning parts, wrong parts, broken, floating high, polarity, Weld, air welding, excess glue, tin holes, the pins are not out, etc. |
| Special features | Run multiple programs simultaneously, supports automatic retrieval program; can check 0-359 ° rotating member (unit 1 °) |
| Minimum part test | 20 µ m: 0201chip & 0.3pitch IC |
| SPC and process-control | The whole record test data and statistics and analysis, can be viewed in any area of production conditions and quality analysis can output Excel, Txt and other file formats |
| Barcode Systems | The camera automatically identify and transfer Barcode (1-dimensional or two-dimensional code), and multi-Mark function (including Bad Mark) |
| Server mode | With central server can be several AOI data centralized management |
| Operating system | Windows XP Professional |
| Check the result output | 22-inch LCD monitor |
| System Parameters System Specifications | |
| PCB size range | 50 × 50mm (Min) ~ 430 × 330mm (Max) |
| PCB thickness range | 0.3 to 5 mm ; |
| PCB clamping system edge gap | TOP: 3.5 mm Bottom: 3.5 mm |
| PCB maximum weight | 3KG |
| PCB curvature | <5mm or 2% PCB diagonal length of |
| PCB upper and lower clear height | PCB above (Top Side): 50 mm PCB bottom (Bottom Side): 110 mm |
| Conveyor system | Automatically open and put away the bilateral fixture, automatically compensates for PCB bending |
| Conveyor AGL | 880 to 930 mm ; |
| Conveyor flow /Time | PCB to move in the Y direction into the board/out board time: 2 seconds |
| X/Y platform drive | Screw and AC servo motor drive, positioning accuracy <10 µ m; PCB fixed, Camera movement in the X direction |
| Power | AC230V 50/60 Hz less than 0.8KVA |
| Pressure | You do not need |
| Weight | About 520KG |
| Device dimensions | 1070 × 900 × 1380mm (L × W × H) |
| Temperature and humidity | 10 ~ 35 ℃ 35 ~ 80% RH (non-condensing) |
| Equipment Safety | Complies with CE safety standards |
